
How to run Robotics simulations in Maniskill Environment?
Getting started with Robotics simulation environments!

I am documenting my experience with the Maniskill environment in this article.
I was looking for a simulation environment, where I can easily simulate robot policies. I stumbled across Maniskill, while listening to this podcast.
Here Stone Tao, explains about his journey and motivations behind building Maniskill.
First, let us understand the basics. For any simulation environment, we need 2 things:
(1) The Physics Engine
The Physics Engine is a simulator designed specifically to help robots understand how to interact with physical objects.
Maniskill uses a Physics Engine called SAPIEN.
While many simulators focus on robots walking or navigating (like a Roomba avoiding a wall), SAPIEN focuses on manipulation - using a robot arm to open drawers, turn faucets, or pick up cups.
What it does: It calculates the physics of the world. If a robot arm bumps a table, SAPIEN calculates how the table moves, how the objects on it shake, and how the friction feels.
The “Basics” Analogy: Think of SAPIEN as a video game engine (like Unity or Unreal Engine) but built strictly for scientific robots. It simulates the gravity, friction, and “touch” that a robot needs to understand the world.

(2) High-Level Framework
ManiSkill is a collection of tasks and data built on top of SAPIEN.
Just having a physics engine (SAPIEN) isn’t enough; you need specific goals to train the robot. ManiSkill provides those goals. It includes difficult tasks like “pick up this pen,” “pour water from this bucket,” or “assemble this chair.”
What it does: It acts as a standardized test. It provides thousands of demonstrations (digital recordings of a task being done correctly) so researchers can train their AI, and then it scores the AI on how well it can repeat the task.
The “Basics” Analogy: If SAPIEN is the gym building with all the equipment, ManiSkill is the personal trainer who gives you a specific workout plan and tracks your reps.

Most importantly, ManiSkill supports GPU parallelization. Instead of running one robot simulation at a time, you can run 2,000+ simultaneously. This means you can collect millions of training steps in minutes rather than days.
Now, let us see how to get started with Maniskill!
Getting Started with Maniskill
Step 1: Installation
First, you need to install the library and its dependencies. ManiSkill is built on the SAPIEN engine and integrates with PyTorch.
Run this command in your terminal or notebook:
pip install maniskill torchNote: You may also need to set up Vulkan (the graphics API) drivers if you are running this locally.
Step 2: Run a Basic Environment (CPU)
Before we go fast, let’s go slow. We’ll run a single environment on the CPU just to see how the API works. If you’ve used OpenAI Gym or Gymnasium before, this will feel like home.
")
We will load the PegInsertionSide-v1 task, where a robot arm tries to insert a peg into a hole sideways - a classic precision task.

Code to run the “Peg Insertion” task:
import gymnasium as gym
import mani_skill.envs

# Create the environment with a human-viewable render mode
env = gym.make("PegInsertionSide-v1", render_mode="human")
obs, _ = env.reset()

done = False
while not done:
    # Sample a random action (just flailing around for now)
    action = env.action_space.sample()

    # Step the environment
    obs, reward, terminated, truncated, info = env.step(action)
    done = terminated or truncated

    # Render the scene
    env.render()

env.close()
When you run this, you should see a window pop up with a robot arm moving randomly. It won’t succeed, but it proves your physics engine is alive.
Note the similarity between the code syntax here and the Gymnasium code syntax. We are using the same functions: gym.make, env.action.space.sample() etc.
Have a look at this article, where I explain about the Gymnasium environment separately using some practical examples:

Step 3: Unleashing the GPU (The “ManiSkill Magic”)
Now, let’s do what ManiSkill was born to do: massive scaling.
We are going to switch to the PickCube-v1 task and run 2,048 environments at the same time.
import gymnasium as gym
import mani_skill.envs
import torch

# Create 2048 parallel environments
# obs_mode="state" gives us physical data (coordinates) rather than images
env = gym.make("PickCube-v1", num_envs=2048, obs_mode="state")

obs, _ = env.reset()

# Generate random actions for ALL 2048 environments
# Note: ManiSkill expects a PyTorch tensor for actions on GPU
action_batch = torch.from_numpy(env.action_space.sample())

# Step all 2048 environments instantly
obs, reward, terminated, truncated, info = env.step(action_batch)

print(f"Observation shape: {obs.shape}")
# Output: torch.Size([2048, 42])
If you check your performance logs, you’ll likely see this running at over 20,000 Frames Per Second (FPS) on a standard GPU (like a T4 or RTX 3060). This speed is the “unfair advantage” of modern robot learning.
Step 4: Training an Agent with PPO
Flailing randomly is fun, but let’s actually teach the robot something.
ManiSkill comes with pre-baked training scripts for Proximal Policy Optimization (PPO), a popular reinforcement learning algorithm. We can use these to solve the PushCube-v1 task in just a few minutes.
1. Get the training script: Download the high-performance PPO implementation provided by the ManiSkill team:
wget https://raw.githubusercontent.com/haosulab/ManiSkill/main/examples/baselines/ppo/ppo.py2. Start Training: Run the following command in your terminal. This will spin up 1,024 parallel environments and train for 600,000 steps.
python ppo.py --env_id="PushCube-v1" \
  --num_envs=1024 \
  --update_epochs=8 \
  --num_minibatches=32 \
  --total_timesteps=600_000
What’s happening here?
num_envs=1024: We are gathering experience from 1,024 “timelines” simultaneously.
total_timesteps=600_000: The agent will practice 600k interactions. Because of parallelization, this might finish in less than 2 minutes.
Once finished, the script will save a model checkpoint and often generate a video showing the robot successfully pushing the cube to its target.
Step 5: Learning from Experts (Imitation Learning)
Maybe you don’t want the robot to learn by trial and error. Maybe you want to show it what to do. This is called Imitation Learning, and ManiSkill has a massive dataset of expert demonstrations ready to download.
Download the data:
# Downloads expert demos for the Peg Insertion task
python -m mani_skill.utils.download_demo "PegInsertionSide-v1" -o demos
Watch the expert: You can replay these demonstrations to visualize “perfect” behavior:
python -m mani_skill.trajectory.replay_trajectory \
  --traj-path demos/PegInsertionSide-v1/motionplanning/trajectory.h5 \
  --save-video --allow-failure
This generates a video file (usually in the videos folder) where you can see exactly how the motion planner solves the puzzle.
This shows the following:
ManiSkill lowers the barrier to entry for robotics research significantly. You no longer need a supercomputer to test advanced RL algorithms; you just need a laptop and a few lines of Python.
Training a Robot using ACT Policy in Simulation
If you’ve been following AI robotics lately, you’ve likely seen the Aloha robot - those bimanual arms cooking shrimp or folding clothes. The “brain” behind that robot isn’t magic; it’s an architecture called ACT (Action Chunking with Transformers).
But here is the problem: Physical robots are expensive. They break. They are hard to reset.
The solution? Simulation.
Today, I’m going to walk you through how to train a robot arm to perform a manipulation task (picking up a cube) from scratch, entirely in simulation, using a single GPU (like on RunPod). We will be using ManiSkill, a lightning-fast simulator, and the official ACT implementation.
The Tech Stack
We are going to use a pipeline that mimics a real-world workflow:
The Simulator: ManiSkill (uses GPU physics to run fast).
The Brain: ACT (Imitation Learning that predicts “chunks” of future actions).
The Task:
PickCube-v1(The “Hello World” of robotics).
Step 1: The Environment Setup
Robotics simulation is notorious for “dependency hell”—specifically getting Vulkan drivers (for rendering images) to play nice with headless cloud GPUs.
If you are running this on a cloud provider like RunPod (recommended: RTX 3090 or 4090), you need to install system-level drivers before Python libraries.
I’ve condensed the setup into a script that handles the heavy lifting. It installs Vulkan, sets up the NVIDIA ICD files, and installs the specific versions of torch and mani_skill required.
What’s happening under the hood? Normally, simulators run on a CPU. ManiSkill runs physics on the GPU. This allows us to collect data and train massively faster than real time.
Step 2: Getting “Expert” Data
ACT is a form of Imitation Learning. This means we don’t punish or reward the robot (like in Reinforcement Learning); instead, we show it examples of a human (or a script) doing the job perfectly, and say, “Do it like this.”
In the real world, you would control the robot via teleoperation to collect data. In ManiSkill, we can download pre-recorded “perfect” trajectories.
# This downloads the expert motion planning data
python -m mani_skill.utils.download_demo "PickCube-v1"
The “Vision” Problem
The downloaded demos are usually stored as State data (exact XYZ coordinates of the cube). But we want our robot to see with cameras, just like a real robot would.
We use a process called Trajectory Replay. We take the coordinate data, replay it inside the simulator, and render the camera views (RGB + Depth) frame-by-frame. This creates a new dataset containing the video feed the robot would have seen if it were doing the task.
In the pipeline script, this command handles the conversion:
python -m mani_skill.trajectory.replay_trajectory \
    --traj-path ~/.maniskill/demos/PickCube-v1/motionplanning/trajectory.h5 \
    --use-env-states \
    -o rgbd \
    --save-video
Note: We use --use-env-states to ensure the replay is physically accurate to the original demo.
Step 3: Action Chunking with Transformers (ACT)
Now for the magic. Why is ACT better than standard behavioral cloning?
Standard policies look at an image and predict one step: “Move left 1mm.” ACT looks at an image and predicts a chunk of steps: “Move left, then down, then close gripper.”
This “chunking” makes the robot’s motion smoother and less jittery. It uses a VAE (Variational Autoencoder) to compress the style of movement and a Transformer to predict the sequence.
The Training Loop
We utilize a unified training script (train_act.sh) that automates the process. For the PickCube-v1 task, we don’t need a massive compute cluster.
Key Hyperparameters:
Demos: 100 trajectories is usually enough for this simple task.
Iterations: 30,000 gradient steps (about 15-20 minutes on an RTX 4090).
Episode Length: 125 steps (if it takes longer, the robot has likely failed).
The script launches the training:
python train_rgbd.py \
--env-id PickCube-v1 \
--demo-path demos/PickCube-v1/rgbd_trajectory.h5 \
--control-mode pd_joint_delta_pos \
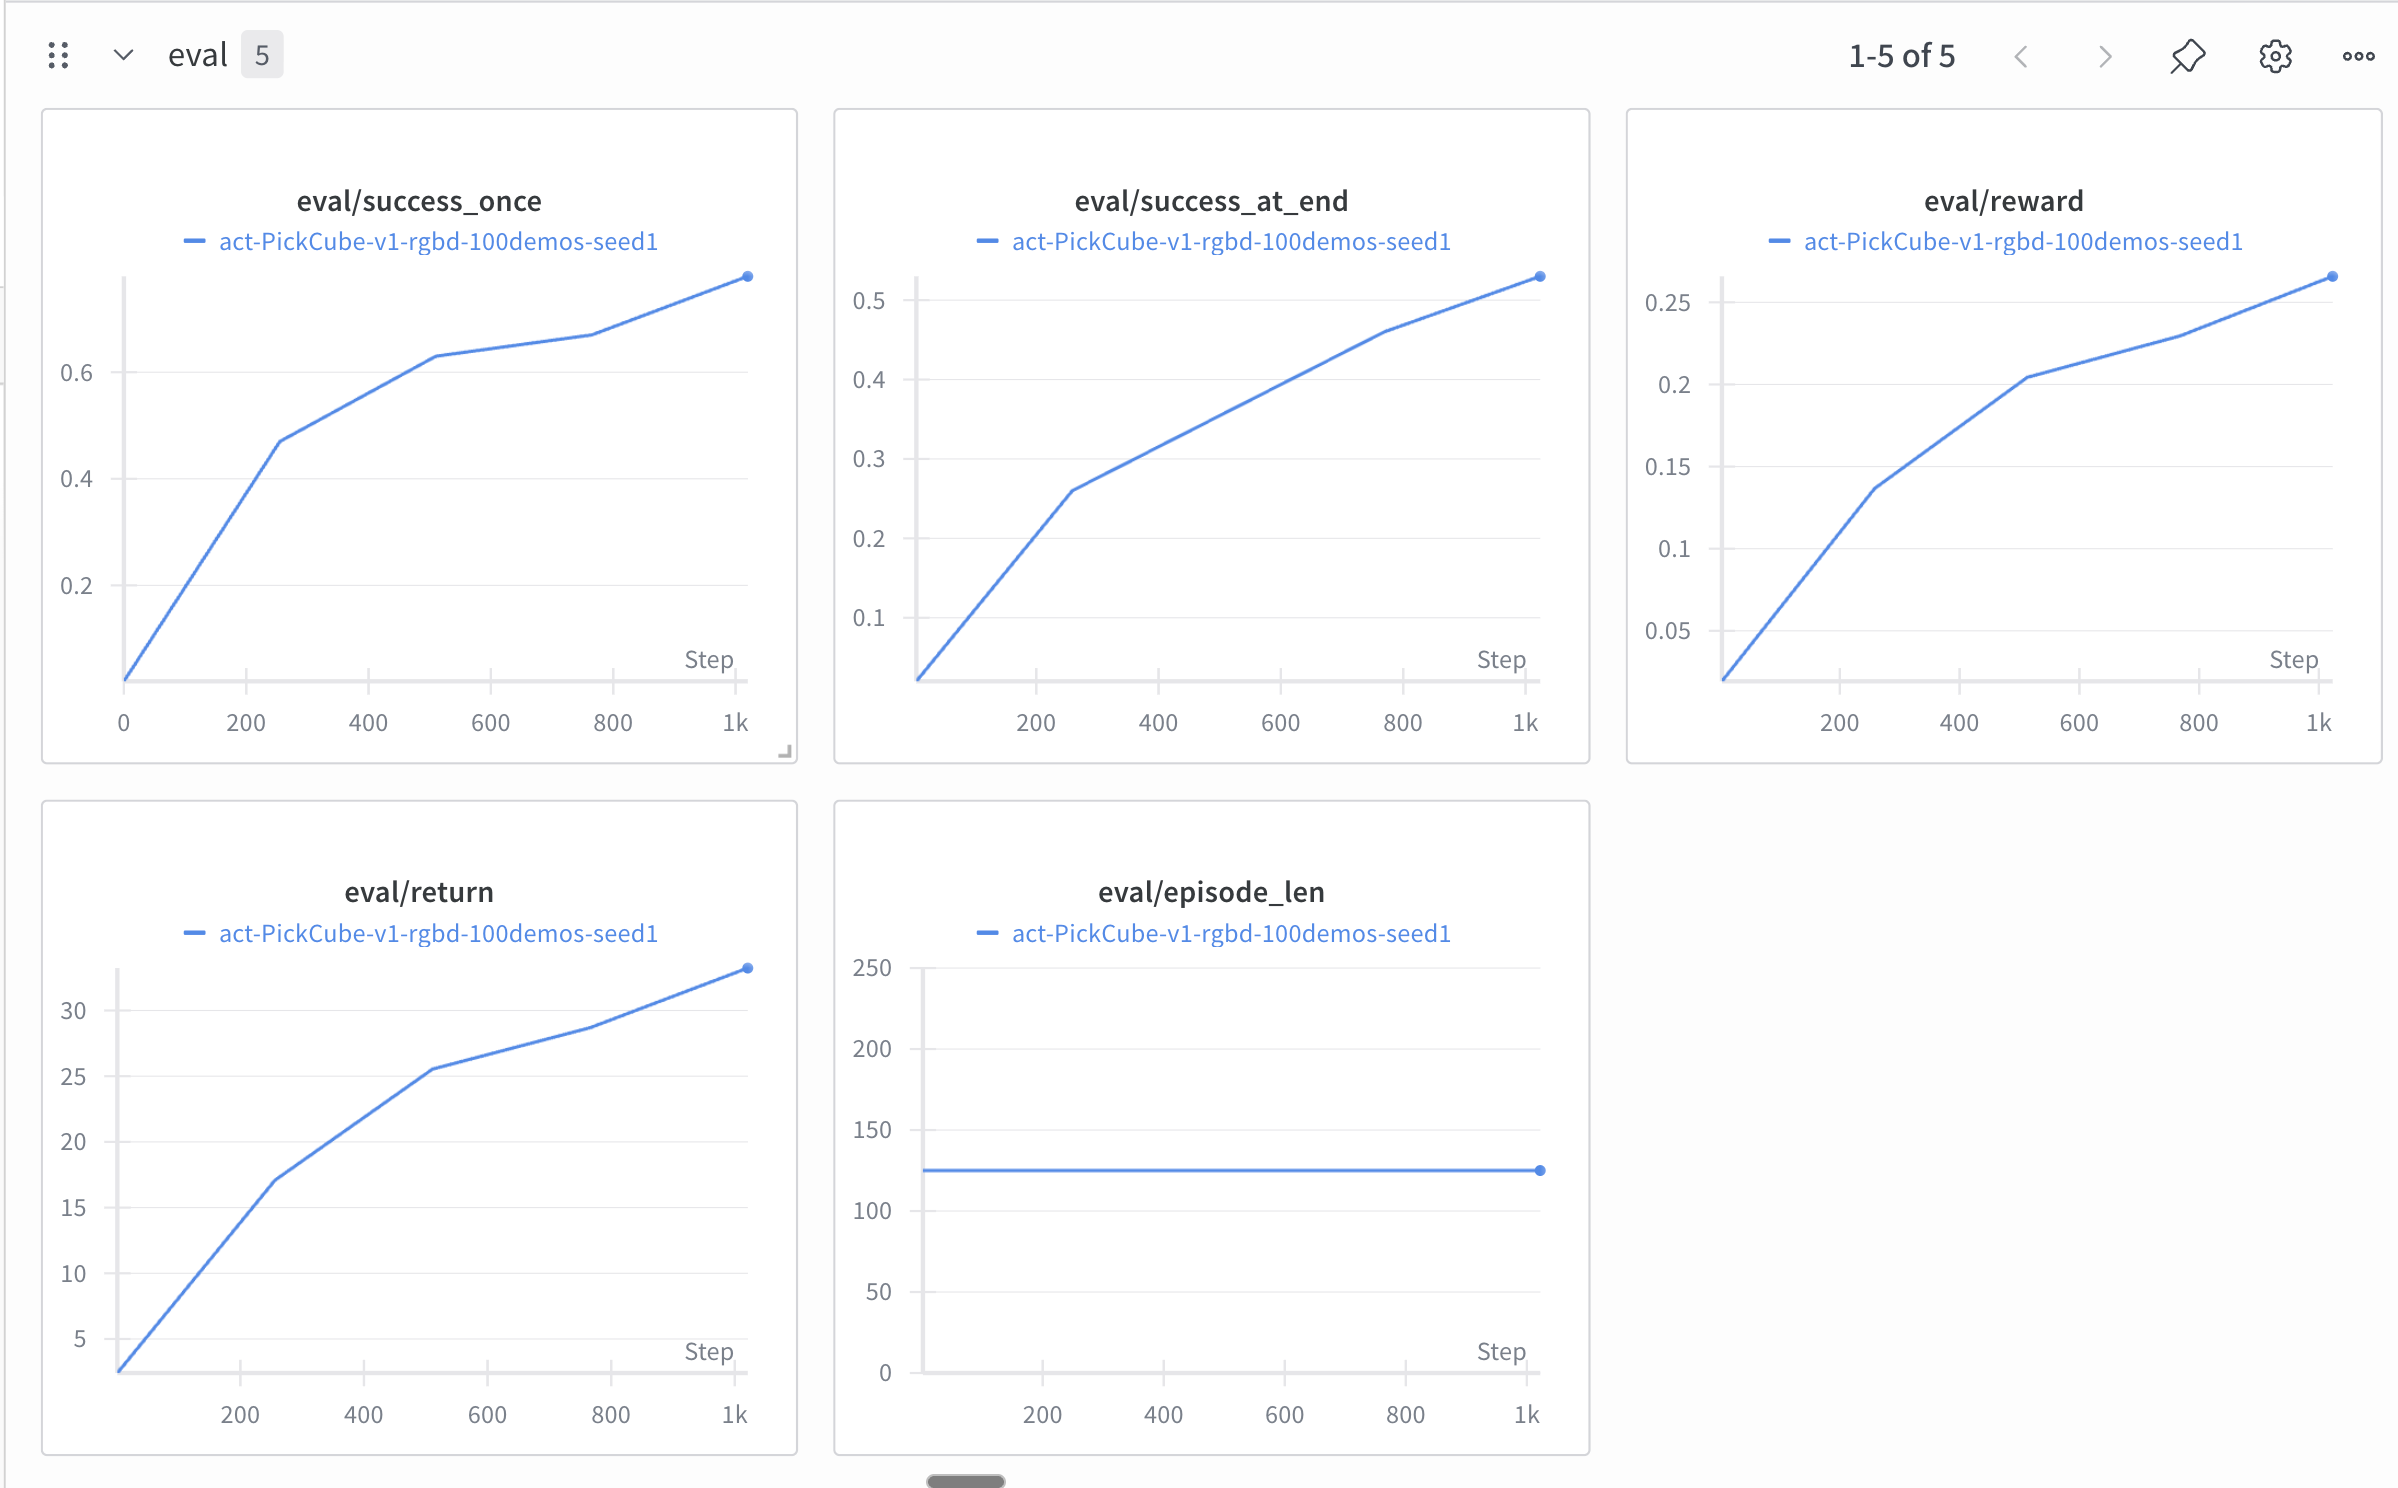
--total_iters 30000Step 4: Seeing the Results
Once training is done, looking at a loss curve isn’t enough. In robotics, you need to watch the video.
The pipeline automatically runs an Inference step. It loads the saved model weights (best_eval_success_once.pt) and runs the robot in a fresh environment it hasn’t seen before.
What to look for:
Smoothness: Does the arm jitter, or does it swoop down confidently? (ACT is known for the swoop).
Recovery: If the robot misses the grasp slightly, does it adjust?
Success Rate: For picking up a cube, a well-trained ACT policy should hit nearly 100% success.
Here are some of the results we got after training!
Video 1:
Video 2:
Video 3:
Video 4:
Video 5:
The robot is learning the pick and place successfully!
Look at the evaluation curves! They look promising :)
You can follow the Github repo here to replicate these results:
You can follow the Github repo here to replicate these results: https://github.com/VizuaraAILabs/ACT-Maniskill
We used Runpod for training the policy. We used the RTX-4090 GPU.
Just clone the repo and run the following commands:
(1) bash setup_maniskill.sh
(2) bash train_act.sh
That’s it!
If you like this content, please check out our bootcamps on the following topics:
Modern Robot Learning: https://robotlearningbootcamp.vizuara.ai/
GenAI: https://flyvidesh.online/gen-ai-professional-bootcamp
RL: https://rlresearcherbootcamp.vizuara.ai/
SciML: https://flyvidesh.online/ml-bootcamp