
Day 2: A Deep Dive into Object Detection and Segmentation using YOLOv8 and OpenCV
Computer Vision Hands-on Bootcamp


When I first started learning computer vision, I thought object detection meant drawing a box around something. That’s it. Find the object. Put a rectangle around it. Done.
But very quickly, I realised that the moment we move from static image detection to video streams or real-time applications, this idea of just drawing boxes is not enough. In fact, it becomes limiting.
Think about a traffic camera trying to count how many cars passed in a minute. Or a factory line trying to detect defective items moving on a belt. Or a security camera that should not just detect people but also track where each person is going. These are not problems of just detection. These are problems of tracking, counting, segmentation, and real-time video annotation. And that is where the real power of computer vision begins.
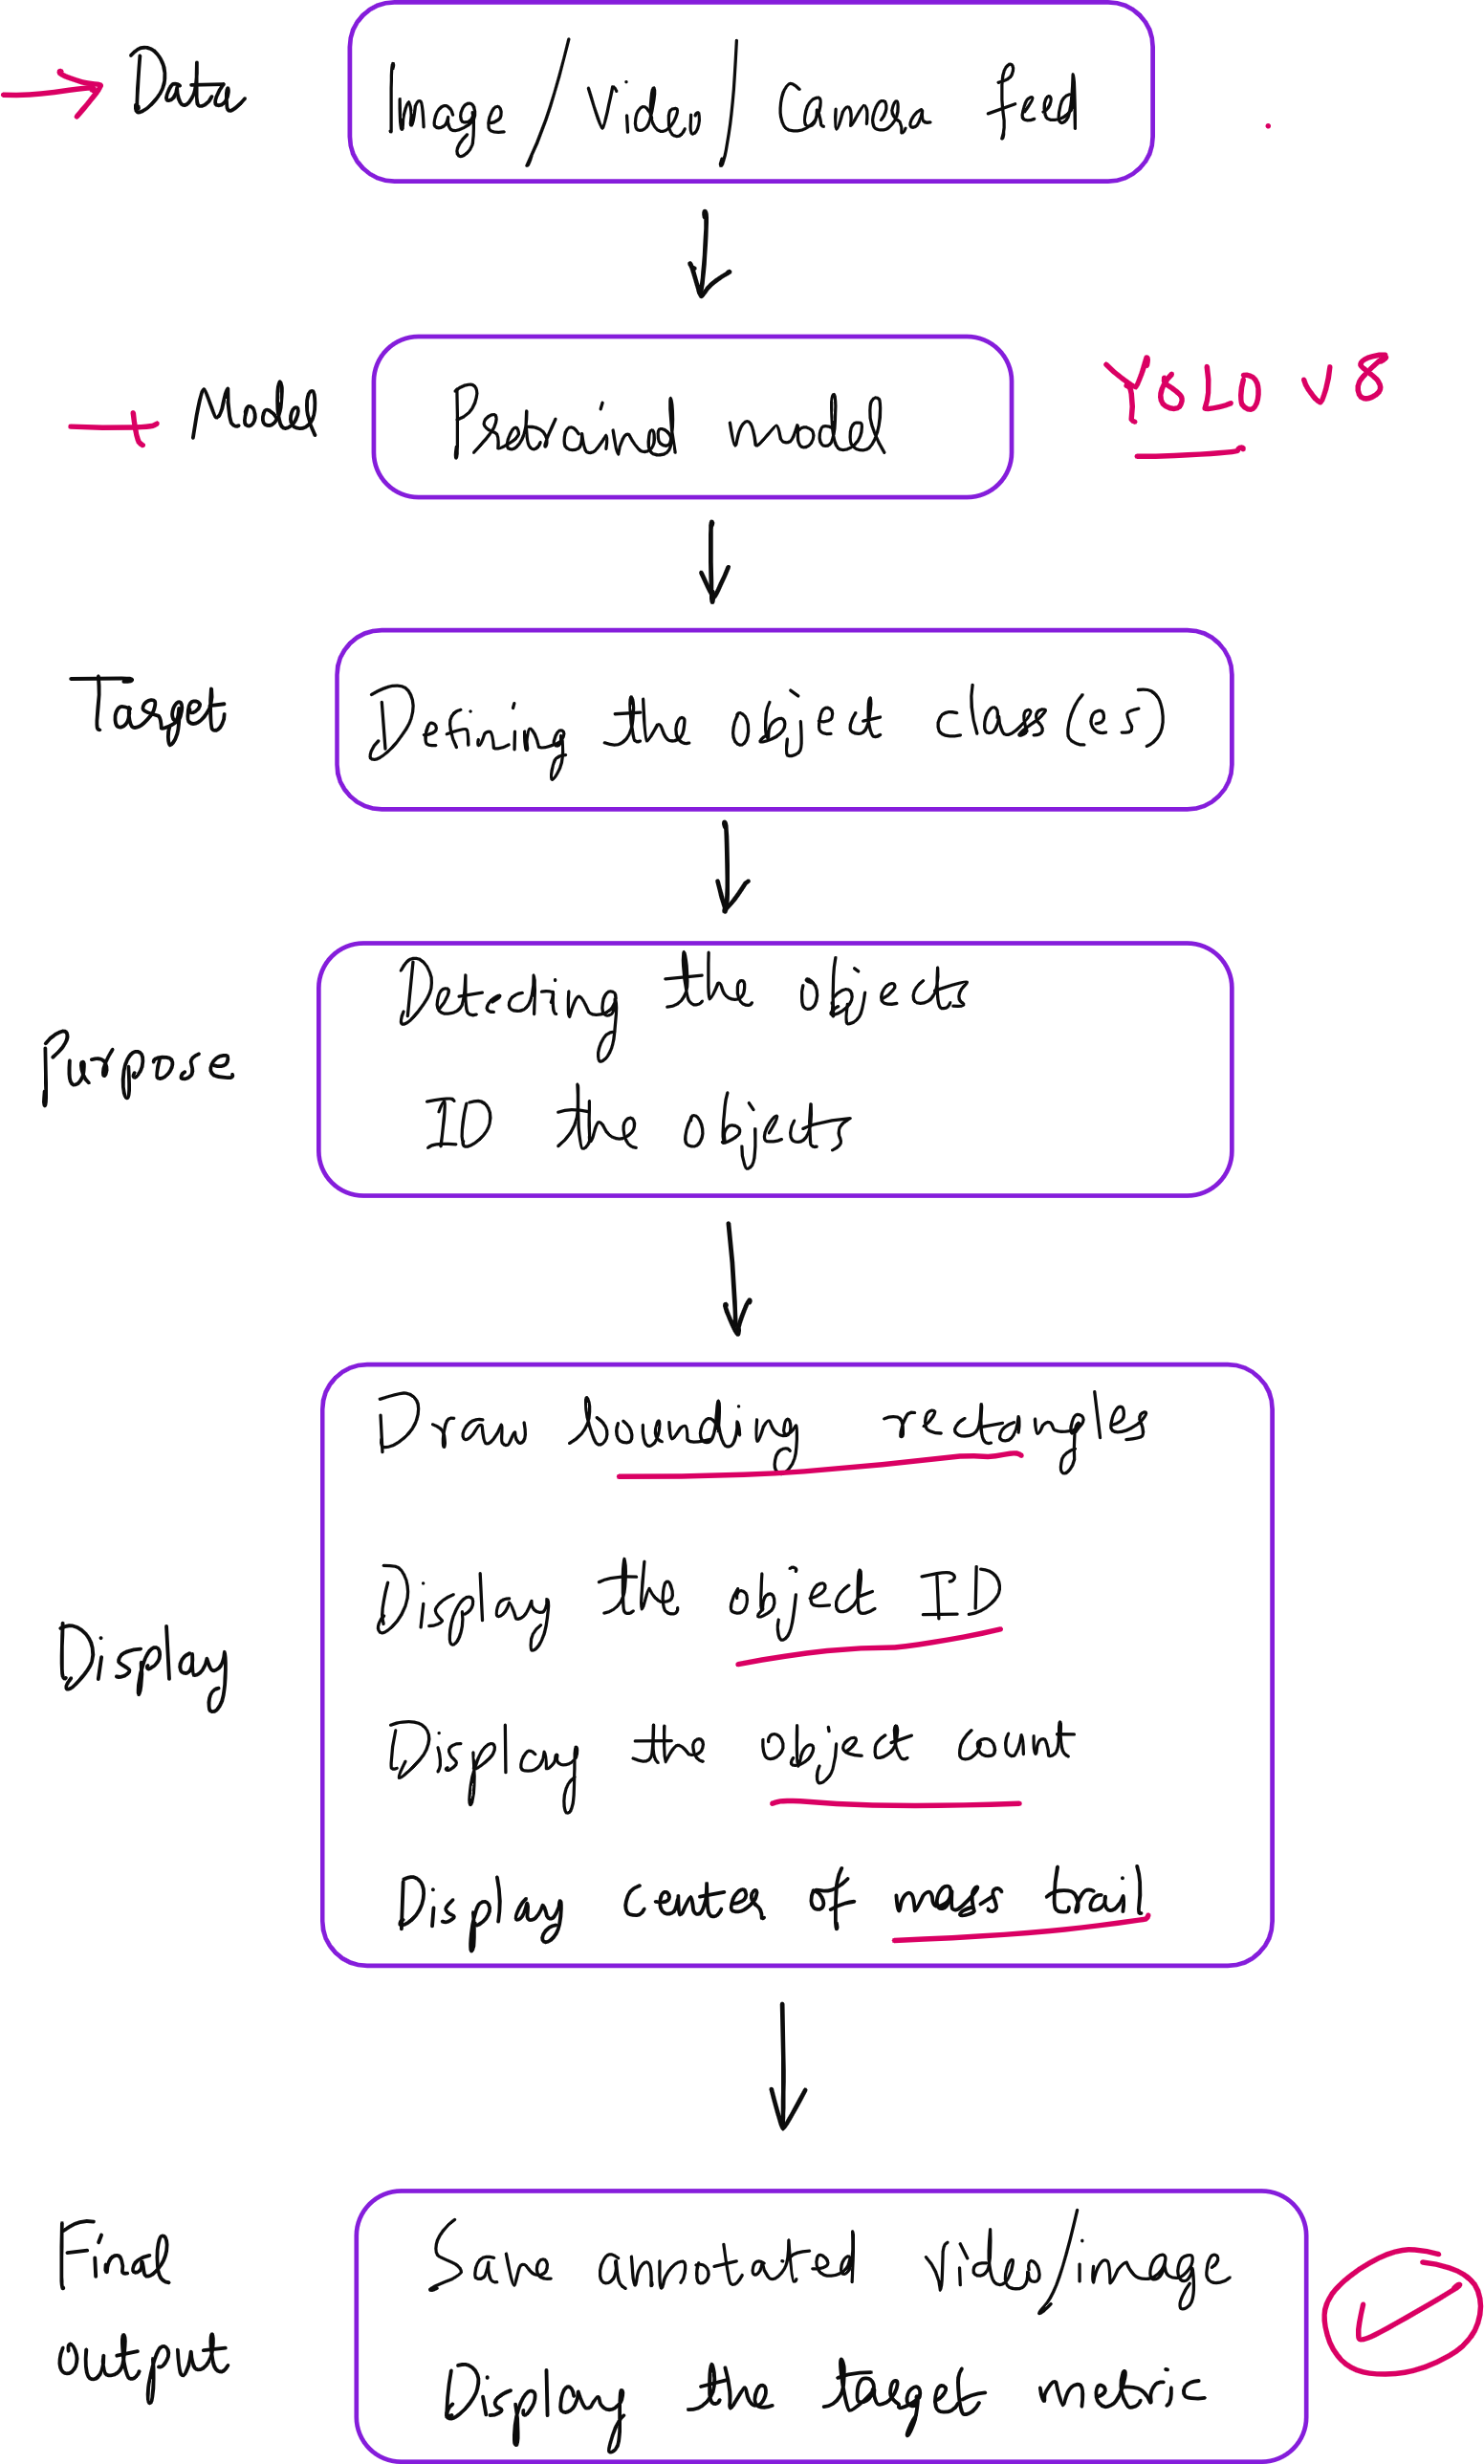
In our second lecture of the Hands-on Computer Vision Bootcamp at Vizuara, we tried to take our students beyond the textbook definition of object detection and into the real world of applications. We built, from scratch, an integrated computer vision pipeline using YOLOv8 for the model and OpenCV for visualization and control. Let me walk you through the key ideas we explored, the code we wrote, and the lessons we learned.
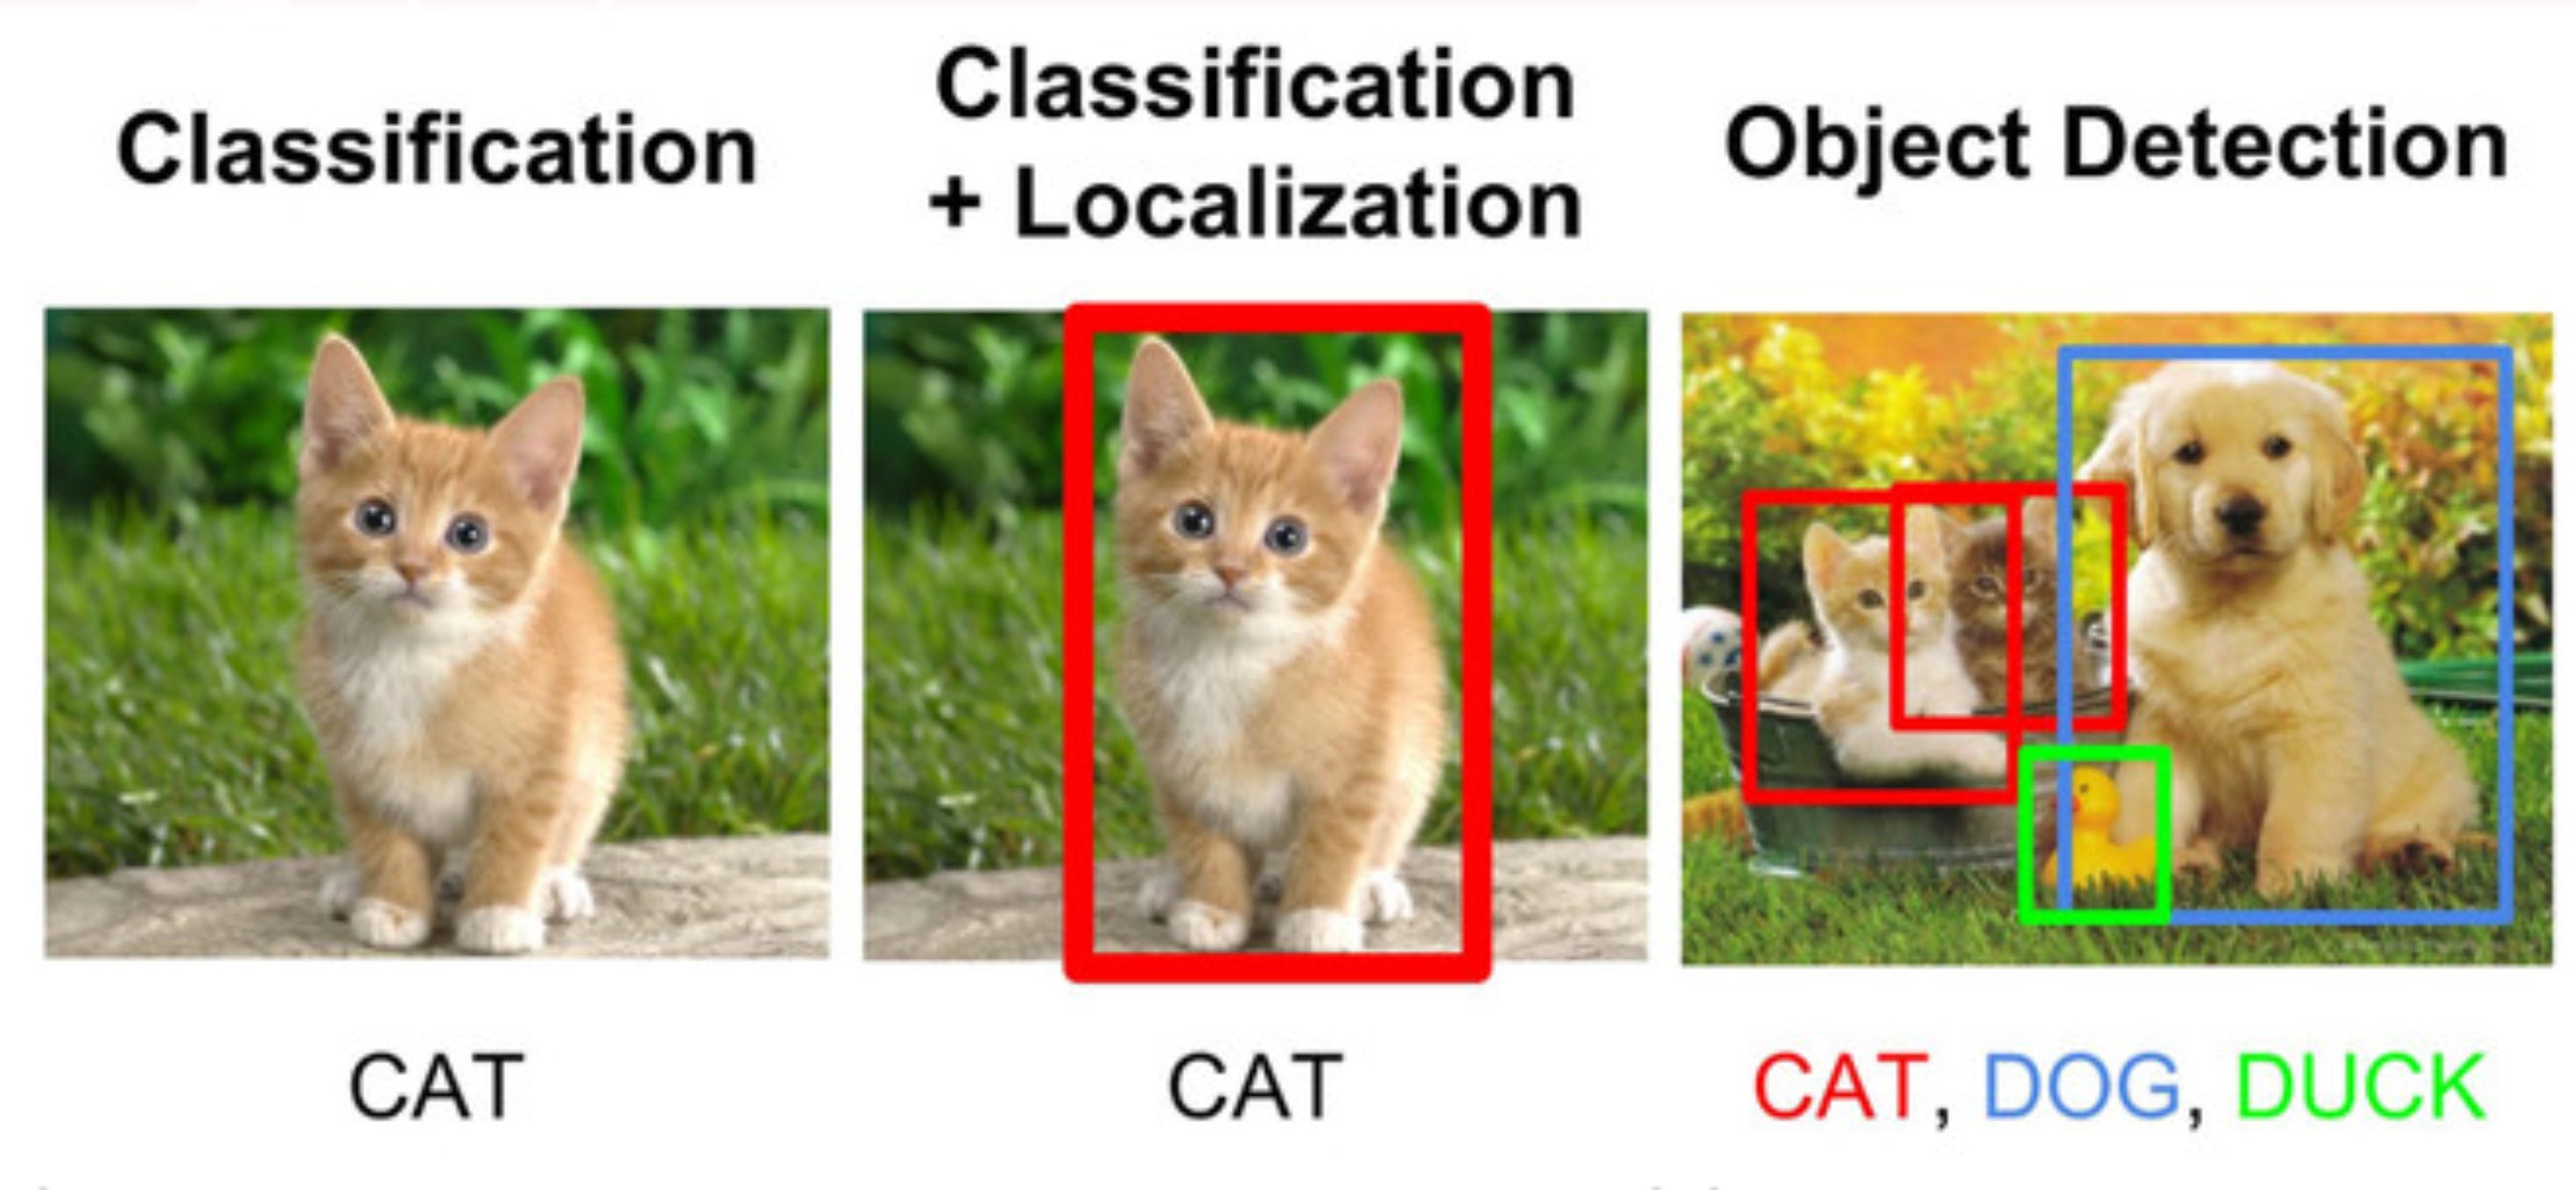
Detection is Just the Beginning
We started with a simple detection task. Take an image, pass it through YOLOv8, and draw bounding boxes around people. This is where most people begin, and it is an excellent place to start. The Ultralytics YOLOv8 models provide a very clean Python API, and using just a few lines of code, we were able to load a model, detect objects, and annotate an image.

But the moment we switch to a video stream-be it from a webcam, a video file, or even a drone feed-we encounter a new challenge: temporal consistency.
In other words, how do we know that the person detected in frame 1 is the same person we are seeing in frame 2? And in frame 3? And so on?
Tracking: Giving Identity to Movement
To solve this, we used YOLOv8’s built-in tracking feature. By setting persist=True and using the track() function instead of predict(), we ensured that each detected object was given a unique ID that remained consistent across frames. This small change made a big difference.
We could now do things like:
Assign a person ID and label them on screen
Track the path of a vehicle or person across the video
Count how many unique objects entered the frame
What surprised many students was how easy it was to implement these ideas. Once the IDs are stable, the rest becomes a matter of maintaining dictionaries and sets in Python.
For example, to count how many people appeared, we simply added each new ID to a set. The length of the set gave us the count. Pure Python. Nothing fancy.
Drawing Motion Trails and Annotated Frames
With the IDs in place, we moved on to motion trails. Every time an object moved, we captured its centroid and stored it in a history deque. Then we used OpenCV’s polylines() to draw the path. This allowed us to see where each object was coming from and where it was going.
We also added live text annotations on top of the frame using cv2.putText(), showing object ID, confidence score, and even direction of motion in some cases.
At this point, our pipeline was already quite powerful:
Real-time detection
Real-time tracking
Annotated video with IDs and trails
Automatic object counting
But there was more.
Segmentation: Seeing the Object, Not Just Boxing It
Bounding boxes are useful, but they do not capture the shape of an object. They do not tell you which pixels actually belong to the object. They just tell you that something is inside the box.
This is where segmentation comes in. And YOLOv8 now supports segmentation directly.
Using the yolov8n-seg.pt model, we extracted masks-which are binary images that mark the exact pixel-level boundary of each object.
From these masks, we extracted contours using cv2.findContours() and drew the object outlines on top of the video frame. Suddenly, the visual output looked more polished and more precise. Instead of boxes, we saw the object’s true shape moving across the screen.
We also tried drawing just the contours, coloring only the edges, and leaving the interiors transparent. This created a very clean and professional overlay, which would be useful for surveillance, UI design, and even artistic rendering.
Saving Annotated Output and Exploring Edge Cases
Of course, building a pipeline is only half the task. We also need to save the output for later use. Using OpenCV’s VideoWriter, we saved the entire annotated stream as a .mp4 file, so it could be shared, reviewed, or used in presentations.
We then explored real-world edge cases:
Transparent objects like bottles that YOLO sometimes struggles to segment
Fast motion where trails become jagged or disappear
Overlapping objects in drone footage or crowd scenes
Low-light conditions where detection confidence drops
Each of these gave us an opportunity to think deeply about model limitations and where additional tuning or training would be required.
A Glimpse of What Is Coming Next
We ended the session by discussing R-CNN, Fast R-CNN, and Mask R-CNN-models that improve upon YOLO in certain ways and have a more classical two-stage pipeline. These will be part of the next few lectures in the bootcamp.
But the takeaway from this session was clear.
If you understand detection, tracking, and segmentation-if you know how to combine OpenCV’s flexibility with YOLO’s intelligence-you can already build meaningful, real-world applications.
You do not need to wait until you “finish the entire theory.”
You do not need a GPU to get started.
You do not need perfect code.
You just need the willingness to build, test, debug, and improve. And with that, your journey in computer vision will already be well underway.
Want to Build Along With Us?
This article is based on our Lecture 2 from the Hands-on Computer Vision Bootcamp at Vizuara.
In this bootcamp, we teach by building. You will not just learn what models do, you will see them in action, code them from scratch, and deploy them in mini-projects.
We have upcoming lectures on:
R-CNN and its variants
U-Net and image segmentation
YOLOv8 segmentation projects
Object detection for drone and traffic videos
If you would like to attend the live lectures, follow along with the code, and become confident in applying computer vision, reach out. We would love to have you learn with us.
YouTube lecture
Enroll in the PRO version of the bootcamp
https://vizuara.ai/courses/hands-on-computer-vision-bootcamp-pro/