
Building a "Fall Detection" App with Streamlit and Roboflow [Beginner friendly]
Computer Vision for Physical Safety


In the last few months, I have been exploring how we can bring advanced computer vision applications closer to real-world usage. One such project that I worked on was fall detection. The motivation is very simple. Falls are one of the most serious risks for elderly people, and they are also safety hazards in industries where workers are exposed to slippery surfaces or heavy equipment. A reliable system that can monitor video feeds and automatically detect falls can make a big difference in prevention and quick response.
Earlier, I had implemented a fall detection pipeline using YOLO and OpenCV. The pipeline worked well for experiments on my local machine, but it was not very user-friendly. You had to run Python scripts, keep track of video file paths, and open separate windows to see results. That is fine for researchers and engineers, but not for a larger audience who simply want to test the system or deploy it quickly.
This is where Streamlit comes in. Streamlit is a Python framework that allows you to build web-based applications directly from scripts. You do not have to worry about HTML, CSS, or JavaScript. You just write Python code and Streamlit takes care of creating a browser-based UI for you. In this article, I want to show you how I adapted my fall detection pipeline to Streamlit and what important changes were needed compared to the traditional OpenCV approach
.
Why Streamlit?
Let us start with the obvious question: why use Streamlit at all when OpenCV already works?
The answer lies in accessibility. With OpenCV you can annotate videos and visualize them, but that workflow is limited to your local environment. If you want to show the same application to your colleagues or deploy it as a demo, it becomes cumbersome. You would have to set up GUIs or package executables. With Streamlit, you can put the same pipeline behind a neat browser interface. Users can upload their own videos, change parameters like detection thresholds, and even use their webcam directly through the browser. All of this happens without them installing any dependencies.
Connecting to Roboflow for Inference
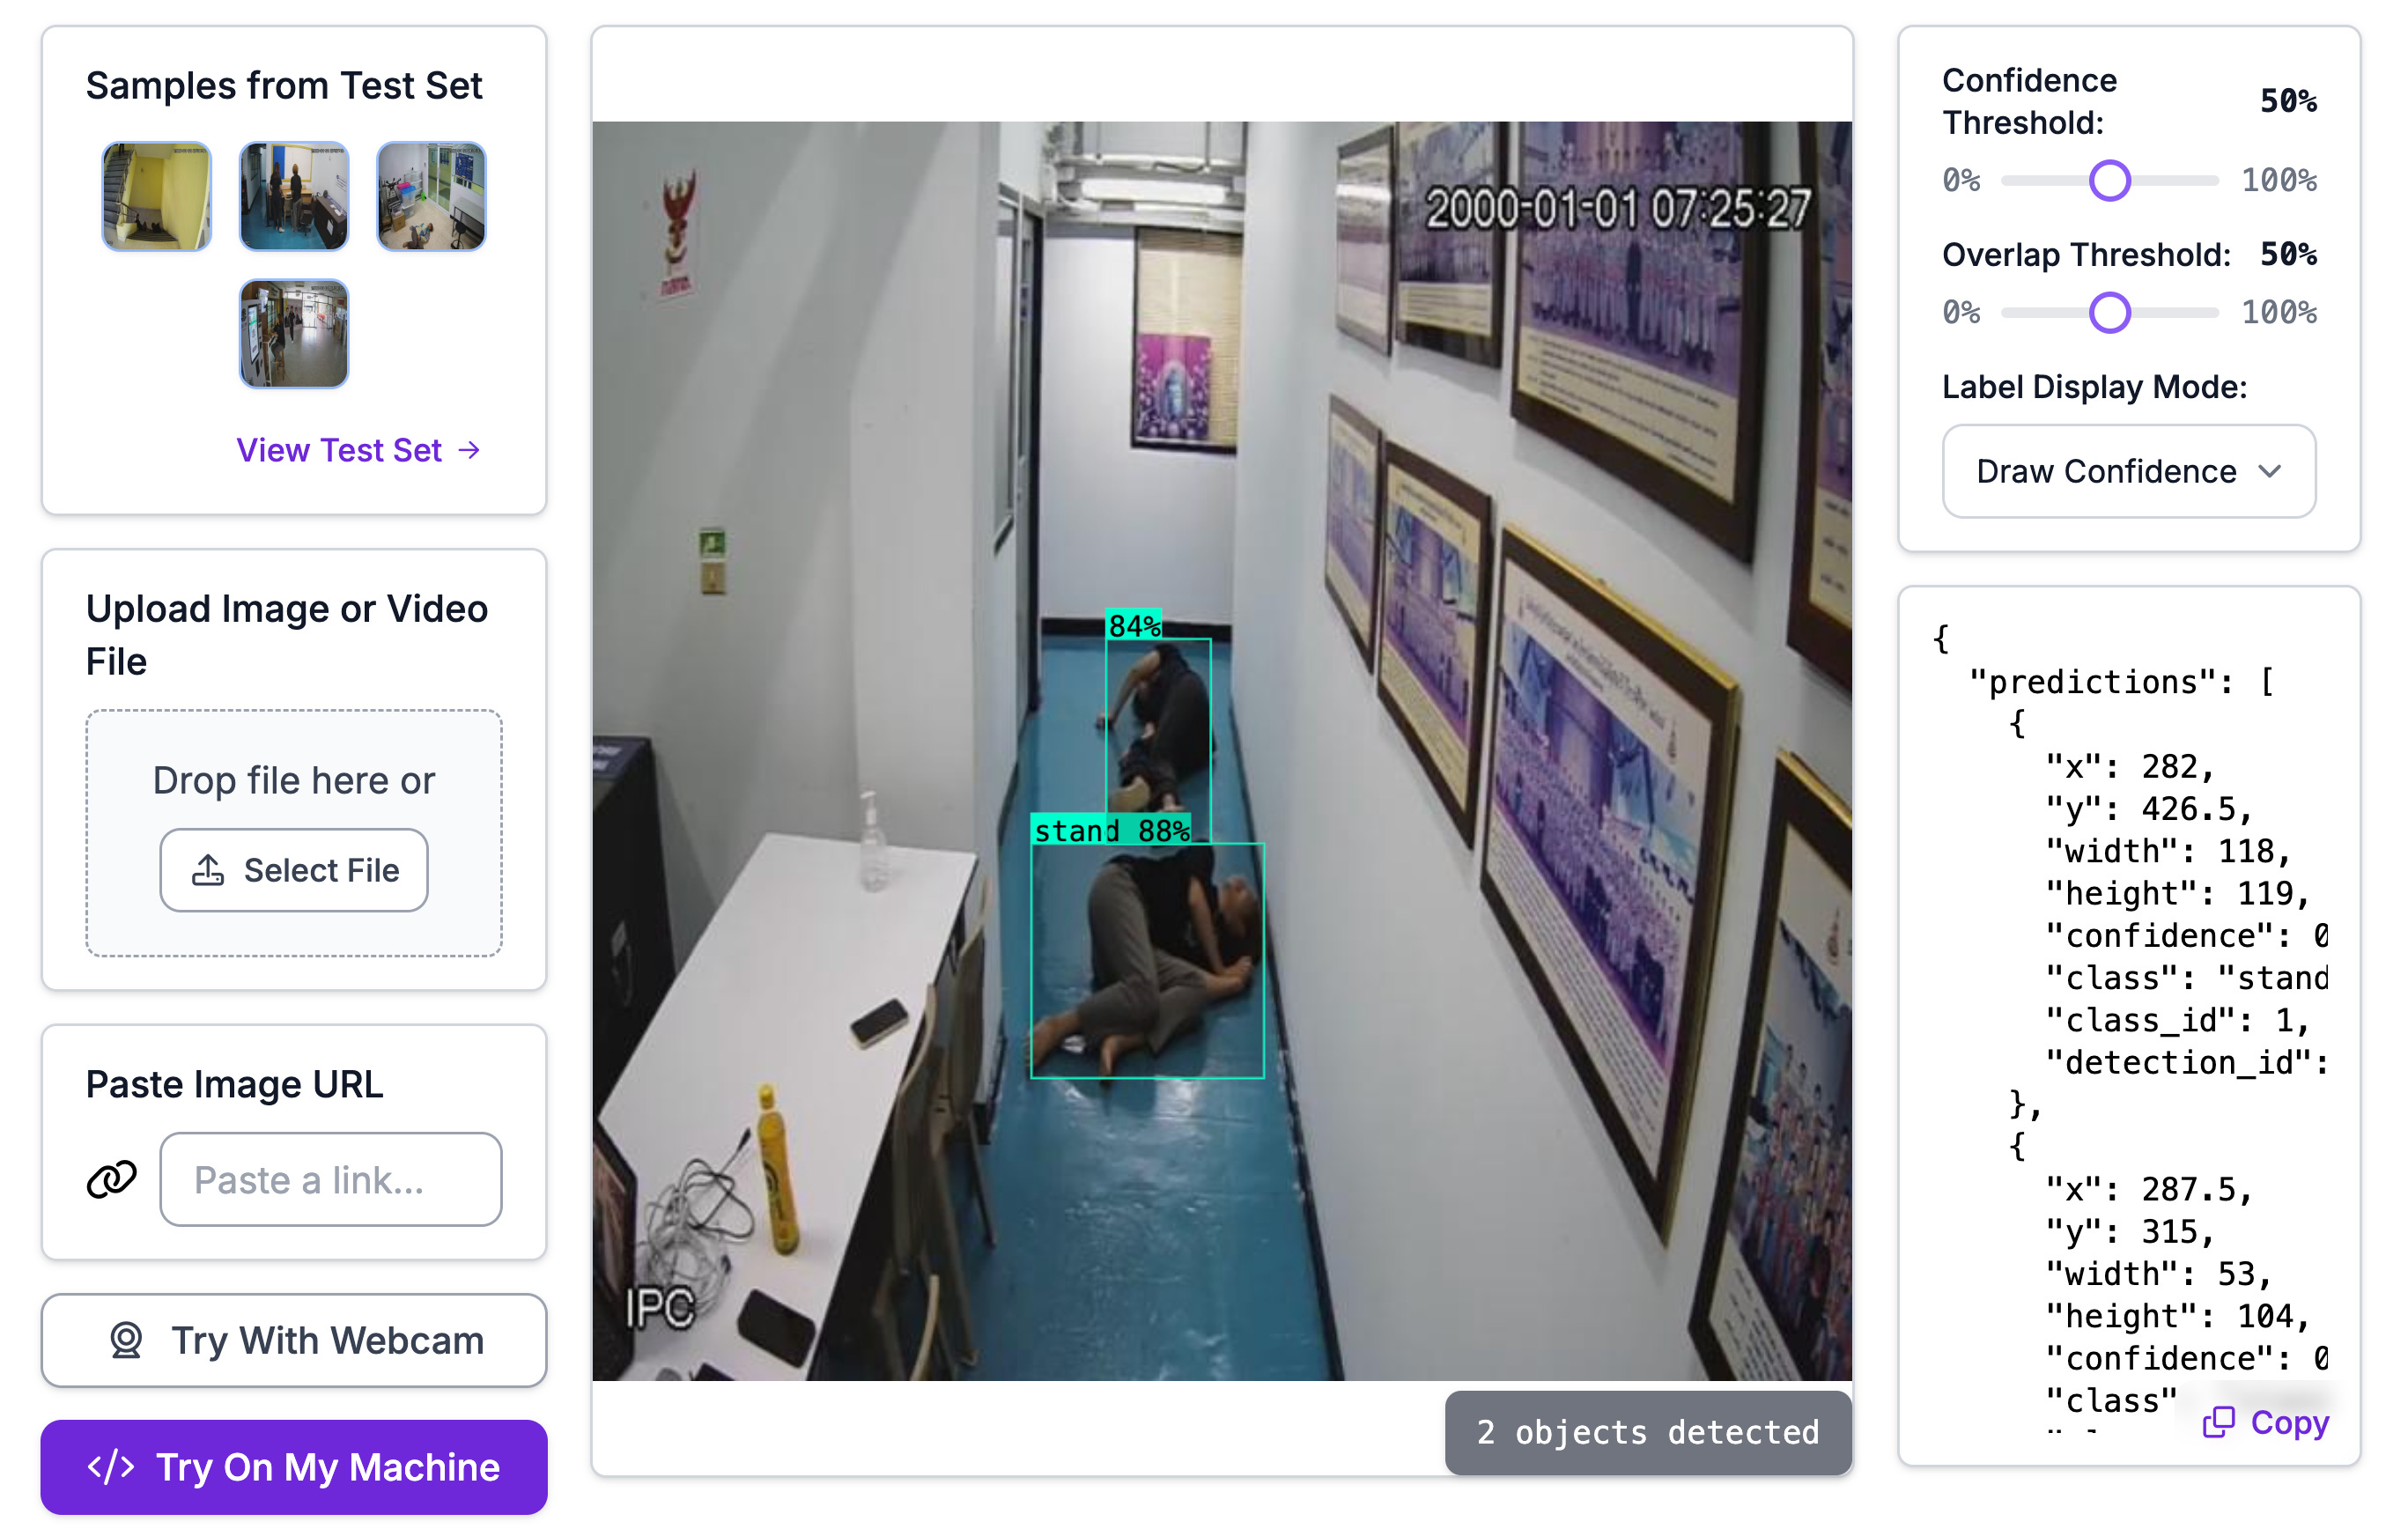
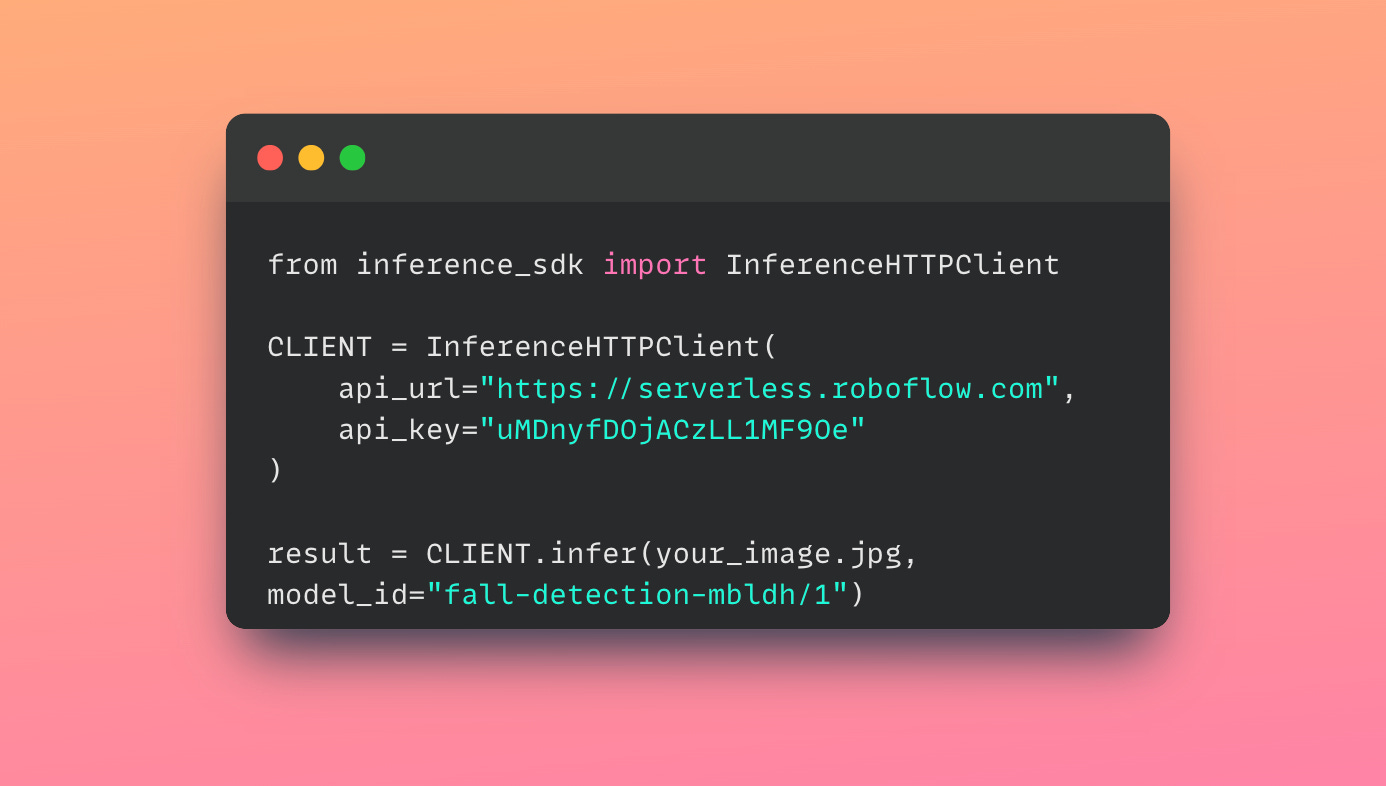
The inference part of the pipeline remains the same as before. I used Roboflow to host a custom-trained fall detection model. Every frame is sent to the Roboflow API, which returns bounding box predictions along with class labels and confidence scores. Since the model had issues with class naming in my dataset, I also flipped the labels for "fall" and "stand". This flipping is done inside the annotation function, where we draw bounding boxes and write labels above them.
Key Differences Between OpenCV and Streamlit Implementation
The most interesting part of this exercise was realizing what changes are necessary when moving from a local OpenCV script to a Streamlit application. Let me go through the most important ones.
1. Displaying Frames
In OpenCV, you normally use cv2.imshow to show a video window. That is not possible in Streamlit because the code runs in a browser. Instead, Streamlit provides widgets like st.image and st.video. For real-time frame updates, we use st.empty() as a placeholder and keep updating it with the current frame. This way, the browser feels like a live video feed.
2. Handling Input Files
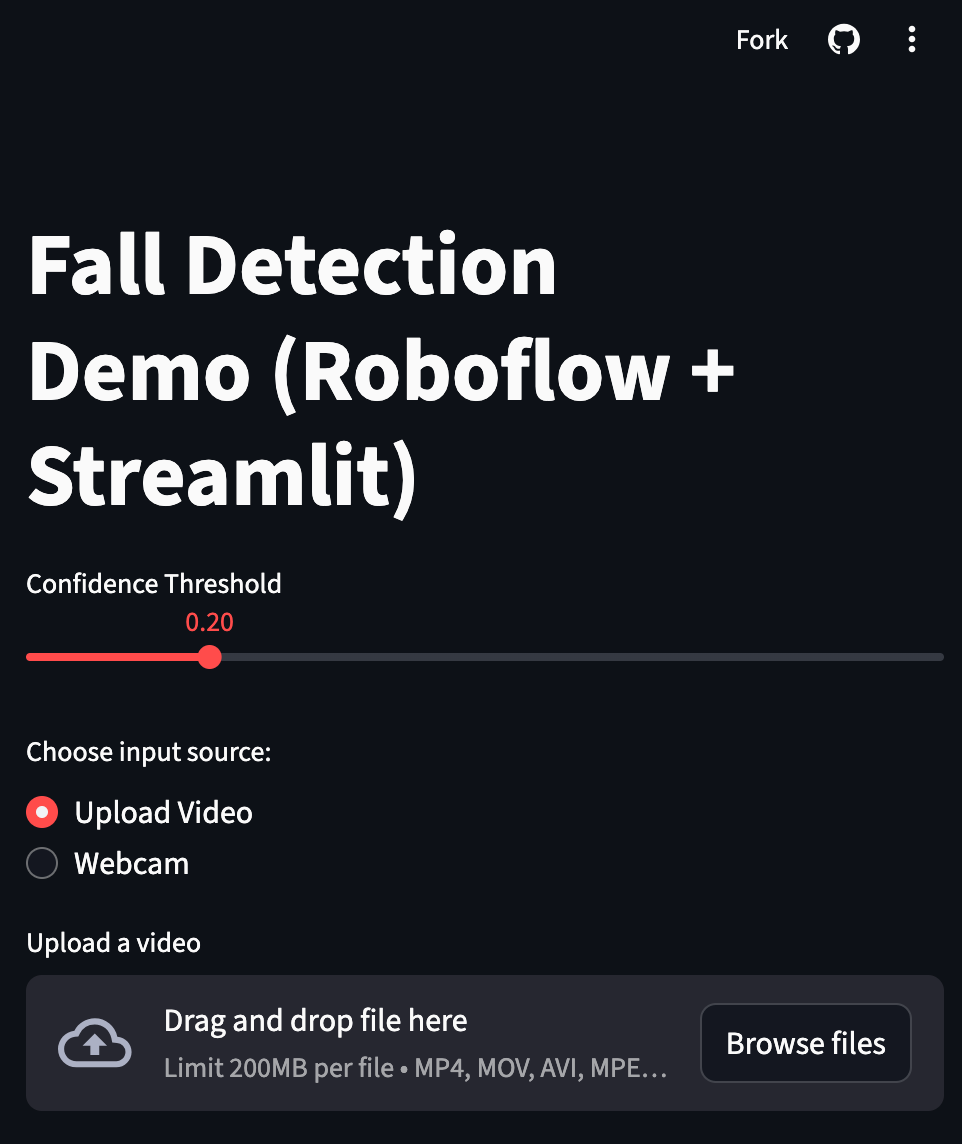
In OpenCV code, the input video is usually hardcoded with a path like "slipsv2.mp4". In Streamlit, we give the user an option to upload their video through a file uploader. The uploaded file is then saved to a temporary file using Python’s tempfile library. OpenCV can then read from that temporary file without issues. This is a crucial change because Streamlit cannot work directly with in-memory uploads when it comes to video processing.
3. Saving Output Videos
In the old script, you would simply use cv2.VideoWriter with a fixed path to save annotated output. That works, but the user has to search for the saved file on disk. In Streamlit, we take a more direct approach. We again use tempfile to create a temporary video file, write all annotated frames to it, and once the processing is complete, we provide a Download button using st.download_button. The user can immediately download the processed video from the browser itself. This small change makes the app much more user-friendly.
4. Webcam Usage
This is another interesting difference. In OpenCV, you can simply open your webcam with cv2.VideoCapture(0). But since Streamlit runs inside a browser, direct access to system devices is not possible. Instead, Streamlit provides a special widget called st.camera_input. This widget allows the browser to capture a snapshot or a short clip from the webcam and pass it back into Python as an uploaded file. We then decode this into a NumPy array, run inference, and display the annotated result. This feels more natural in a web setting compared to the continuous OpenCV webcam feed.
5. Interactive Controls
Parameters like confidence thresholds, which were earlier defined as constants inside the code, can now be made interactive. Streamlit provides sliders, radio buttons, and checkboxes that make it very easy to adjust settings while the app is running. In our case, I replaced the hardcoded confidence threshold with a slider ranging from 0.0 to 1.0. This makes experimentation much easier because the user does not have to modify code or rerun the script.
The Final Streamlit App
When you put all of these changes together, you get a neat Streamlit app. Users can upload a video, see live annotated frames while processing, and download the final processed video. They can also try the webcam feature to test with their own live feed. The best part is that the entire pipeline still runs on the same Roboflow inference API and OpenCV for annotation, but the experience is much smoother.
See the app here [I have disabled the API key though :(
https://fall-detection-computer-vision.streamlit.app/
Lessons Learned
The biggest lesson for me from this exercise was that adapting machine learning pipelines to Streamlit is not about rewriting the logic. It is about rethinking how inputs and outputs are handled. Instead of windows and file paths, you think in terms of widgets and temporary files. Once you make that mental shift, the rest feels straightforward.
Another lesson is that these small adjustments can significantly lower the barrier for people to use your work. A researcher or developer may be comfortable running Python scripts, but for a non-technical stakeholder, a simple web app is much more approachable. Streamlit bridges that gap without demanding a deep dive into web development.
Next Steps
I am currently experimenting with extending this further. For example, making the webcam feature continuous instead of one-shot capture, or hosting the application on Streamlit Cloud so that anyone can test it online without installation. These steps can turn a small side project into something that can actually be deployed in eldercare centers or industrial safety systems.
Closing Thoughts
What I find most satisfying about this project is that it shows how approachable AI applications have become. With tools like Roboflow for dataset preparation and model deployment, OpenCV for annotation, and Streamlit for creating user interfaces, it is possible to go from an idea to a usable prototype very quickly. The technology is no longer locked inside research labs; it is accessible to anyone with curiosity and a willingness to experiment.
YouTube lecture
“Transformers for Vision”
I am also thrilled to share that we are launching a new live program at Vizuara - a 14-week intensive on Transformers for Vision and Multimodal LLMs. The program begins on Monday, September 27th, 2025, and will run weekly from 10.30 AM to 12 PM IST. This is something I have been wanting to teach for a long time, and I look forward to welcoming learners who wish to dive deep into this area. You can find more details and register here: